Tutorial: Converting a project to use Lab Test
We are going to convert a Vue.js component for use with LabTest. This tutorial assumes that the test environment or laboratory is already set up, and you have set up your local machine.
Containerizing
This process involves creating a Dockerfile and a .dockerignore file. These files are used in the generation of the container image.
Dockerfile
This file contains the instructions to build the environment we need to run our project. For this project, we simply need to deliver static files generated during the build process.
The build process puts the JavaScript and CSS files in dist/. It also puts in an index.html for demonstration and testing purposes.
The documentation is in the docs/ directory. Typically that is distributed as GitHub pages, but we are going to add it as a subdirectory so we can see any changes to it as well.
Our Dockerfile ends up being very simple. We use official nginx Docker image running Alpine Linux as a base. The official nginx Docker image serves files in /usr/share/nginx/html/ by default. We then simply need to copy the files into that directory.
Dockerfile¶FROM nginx:alpine
COPY dist/* /usr/share/nginx/html/
COPY docs /usr/share/nginx/html/docs
.dockerignore
When Docker builds the image, it generates a context of all the files it may need in your project directory. Since we don’t need most of the files, this just takes time and memory.
We add a .dockerignore file to tell it to ignore most directories.
.dockerignore¶build
config
node_modules
src
static
test
Building the image
We can now test build the image with docker build -t vizwiz .
$ docker build -t vizwiz .
Sending build context to Docker daemon  9.862MB
Step 1/3 : FROM nginx:alpine
alpine: Pulling from library/nginx
Digest: sha256:3a44395131c5a9704417d19ab4c8d6cb104013659f5babb2f1c632e789588196
Status: Downloaded newer image for nginx:alpine
 ---> ebe2c7c61055
Step 2/3 : COPY dist/* /usr/share/nginx/html/
 ---> 9e7809fa48f3
Step 3/3 : COPY docs /usr/share/nginx/html/docs
 ---> 19f6f03422e0
Successfully built 19f6f03422e0
Successfully tagged vizwiz:latest
Does it work as we expect? Let’s find out! We can run this image with docker run --rm -ti -p 8000:80 vizwiz. When you go to https://localhost:8000/, you will see traffic in your console:
$ docker run --rm -ti -p 8000:80 vizwiz
172.17.0.1 - - [05/May/2018:13:08:48 +0000] "GET / HTTP/1.1" 200 3087 "-" "Mozilla/5.0 (Macintosh; Intel Mac OS X 10_13_4) AppleWebKit/537.36 (KHTML, like Gecko) Chrome/66.0.3359.139 Safari/537.36" "-"
172.17.0.1 - - [05/May/2018:13:08:48 +0000] "GET /vizwiz.min.css HTTP/1.1" 200 242784 "http://localhost:8000/" "Mozilla/5.0 (Macintosh; Intel Mac OS X 10_13_4) AppleWebKit/537.36 (KHTML, like Gecko) Chrome/66.0.3359.139 Safari/537.36" "-"
172.17.0.1 - - [05/May/2018:13:08:48 +0000] "GET /vizwiz.min.js HTTP/1.1" 200 353723 "http://localhost:8000/" "Mozilla/5.0 (Macintosh; Intel Mac OS X 10_13_4) AppleWebKit/537.36 (KHTML, like Gecko) Chrome/66.0.3359.139 Safari/537.36" "-"
Press control-c to stop the running Docker image.
Configuring Lab Test
Lab Test looks for its configuration automatically in several places: .labtest.yml or .labtest.yaml, setup.cfg, or package.json. We simply add a labtest section and put in the configuration items.
Since we already have a package.json file, we will add our Lab Test configuration to it.
package.json file¶{
"name": "vizwiz",
"version": "1.0.0",
"description": "A data visualization widget library",
// other stuff here
"labtest": {
"app_name": "vizwiz",
"host": "test",
"use_ssh_config": true,
"test_domain": "digital-test.boston.gov",
"code_repo_url": "git@github.com:CityOfBoston/vizwiz.git"
}
}
We absolutely have to values for host and test_domain because Lab Test has no way to derive a default value for them.
Building the components
We know that Lab Test can build a Docker image from our code. Before Lab Test can biuld the Docker image, our components must be built. How are we going to tell Lab Test to build our components?
We need two things: a build image and a build command.
To build the components, Lab Test checks out the code (using code_repo_url), runs the build image and mounts the code directory to the /build/ directory inside the container. Lab Test runs the build command inside the build image, not affecting anything else on the server. However, anything done to the /build/ directory passes through to the Test Server file system.
Build image
The build image is a general Docker image that has all the tools pre-installed to build our components. We need a node.js environment, so referring to app_build_image we add "app_build_image": "drydock/u16nodall" to our configuration:
app_build_image to package.json¶{
"name": "vizwiz",
"version": "1.0.0",
"description": "A data visualization widget library",
// other stuff here
"labtest": {
"app_name": "vizwiz",
"host": "test",
"use_ssh_config": true,
"test_domain": "digital-test.boston.gov",
"code_repo_url": "git@github.com:CityOfBoston/vizwiz.git",
"app_build_image": "drydock/u16nodall"
}
}
Build command
The build command is what it takes to build our component. We like to create a small Bash script that runs the commands we need. We create a buildapp script in our project directory.
buildapp script¶#!/bin/bash
nvm use 8
yarn install
yarn run build
We happen to know that the u16nodall uses nvm to select its node environment. We then need to install our packages and run the build script with yarn.
We make this script executable (on MacOS and Linux, anyway) with the command:
$ chmod a+x buildapp
Now we add "app_build_command": "./buildapp" to our configuration:
app_build_command to package.json¶{
"name": "vizwiz",
"version": "1.0.0",
"description": "A data visualization widget library",
// other stuff here
"labtest": {
"app_name": "vizwiz",
"host": "test",
"use_ssh_config": true,
"test_domain": "digital-test.boston.gov",
"code_repo_url": "git@github.com:CityOfBoston/vizwiz.git",
"app_build_image": "drydock/u16nodall",
"app_build_command": "./buildapp"
}
}
Playing in your build environment
If you want to play with the build container to see what it can do, you can run:
$ docker run --rm -ti drydock/u16nodall
and you will drop into a Bash shell in your build environment. If you want to mount your code in this environment use:
$ docker run --rm -ti -v `pwd`:/build -w /build drydock/u16nodall
This mounts the current working directory into /build and makes that your starting working directory.
Note
These are big images. Be prepared for a several GB download.
Are we ready?
So are we ready? We can double check by running labtest check-config.
labtest check-config command¶$ labtest check-config
The configuration is valid.
Configuration:
build_provider: default
verbose: False
app_name: vizwiz
environment: []
container_build_command: docker build -t $APP_NAME/$INSTANCE_NAME --build-arg RELEASE=$RELEASE --build-arg APP_NAME=$APP_NAME --build-arg BRANCH_NAME=$BRANCH_NAME --build-arg INSTANCE_NAME=$INSTANCE_NAME .
host: test
app_build_command: ./buildapp
test_domain: digital-test.boston.gov
docker_image_pattern: %(APP_NAME)s/%(INSTANCE_NAME)s:latest
app_build_image: drydock/u16nodall
use_ssh_config: True
config_file_path: /Users/coordt/Projects/vizwiz/package.json
code_repo_url: git@github.com:CityOfBoston/vizwiz.git
host_name_pattern: %(APP_NAME)s-%(INSTANCE_NAME)s
container_provider: local
Everything is ready locally. We still haven’t committed anything to the repo!
$ git add package.json buildapp Dockerfile .dockerignore
$ git commit -m"Added labtest stuff"
[labtest 488ea92] Added labtest stuff
 4 files changed, 23 insertions(+)
 create mode 100644 .dockerignore
 create mode 100644 Dockerfile
 create mode 100755 buildapp
$ git push
Counting objects: 6, done.
Delta compression using up to 8 threads.
Compressing objects: 100% (5/5), done.
Writing objects: 100% (6/6), 784 bytes | 0 bytes/s, done.
Total 6 (delta 2), reused 0 (delta 0)
remote: Resolving deltas: 100% (2/2), completed with 2 local objects.
To github.com:CityOfBoston/vizwiz.git
Now that our master branch has the configuration, we can make new any branch into an experiment.
Making an experiment
We can create an experiment but running labtest create <branchname>. We’ll create a new branch named foo and create an experiment from it.
labtest create command¶$ git checkout -b foo
Switched to a new branch 'foo'
$ git push
Total 0 (delta 0), reused 0 (delta 0)
To github.com:CityOfBoston/vizwiz.git
* [new branch] foo -> foo
$ labtest create foo
[test] Executing task 'create_instance'
Building the application using drydock/u16nodall and ./buildapp.
[test] put: <file obj> -> /testing/vizwiz/foo/docker-build
[test] put: <file obj> -> /testing/vizwiz/foo/test.env
[test] put: <file obj> -> /tmp/vizwiz-foo.service
Your experiment is available at: vizwiz-foo.digital-test.boston.gov
Success!! Our experiment is available at vizwiz-labtest.digital-test.boston.gov. Each experiment’s URL is created using the template <app_name>-<instance_name>.<test_domain>, although you can configure this via host_name_pattern.
Note
That URL is only for the purposes of this tutorial. It doesn’t work.
Note
Lab Test’s commands are idempotent. You can run the same command over and over without harm.
Updating the experiment
Having an experiment out there is nice, but what if you make changes in the branch?
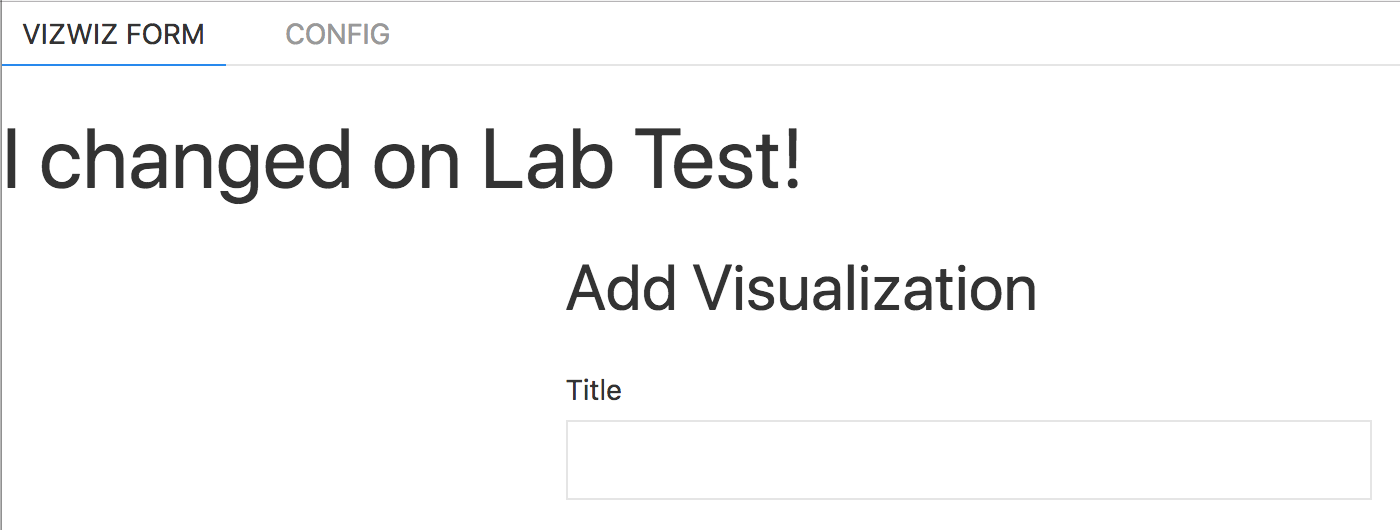
Let’s do that. We made a simple but noticeable change to the base template:

The page before the change
The page after the change
All we have to do is commit and push the changes in our branch, and then tell Lab Test to update our experiment with labtest update <experiment name>:
$ git add index-template.html
$ git commit -m"Updating for lab test tutorial"
[labtest bd5d845] Updating for lab test tutorial
 1 file changed, 1 insertion(+), 1 deletion(-)
$ git push
Counting objects: 3, done.
Delta compression using up to 8 threads.
Compressing objects: 100% (3/3), done.
Writing objects: 100% (3/3), 312 bytes | 0 bytes/s, done.
Total 3 (delta 2), reused 0 (delta 0)
remote: Resolving deltas: 100% (2/2), completed with 2 local objects.
To github.com:CityOfBoston/vizwiz.git
   ff97119..bd5d845  foo -> foo
$ labtest update foo
[test] Executing task 'update_instance'
Building the application using drydock/u16nodall and ./buildapp.
[test] put: <file obj> -> /testing/vizwiz/foo/docker-build
[test] put: <file obj> -> /testing/vizwiz/foo/test.env
Updating should take less time than creating. Depending on your build command, it will use the cached packages installed previously.